Looking for a how to guide on running the year end close in NAV? Here are 3!
Posted: January 22, 2013 Filed under: Uncategorized | Tags: CustomerSource, general ledger, manual, NAV, year end close Leave a commentAll your journal entries are done, all of your modules balance to the general ledger, and your inventory period is closed. You are ready to get that income statement rolled up and close the year. Now where were those instructions? It’s not unusual to be a little unsure about the year end close process – we only get to do it annually, so no one will blame you if you can’t remember exactly what you did last year, and in what order. Here are a couple of resources to help you out.
ABC Computers, Inc. has a nice entry on their technology blog, “How to Close a Fiscal Year in Microsoft Dynamics NAV: Instructions for Annual Closing Operations“. This goes through a quick top level summary and then a deep dive into the closing process with field by field instructions.
If video learning is more your style, Archerpoint has a short 3-4 minute video out there, “Closing the Fiscal Year in NAV” that shows the annual closing process screen by screen.
 Finally, you can always get the full manual on the year end closing process straight from Customer Source. Log in and type in 80041 into the search box. This will get you directly to the “Finance in Microsoft Dynamics 2009” Microsoft course. Download the course and go straight to the file for Chapter 10 – Year End Closing Processes.
Remember, you can always make entries after you’ve gone through your initial income statement rollup. You don’t need to wait for that very last entry to get this process going.
Tips and tricks for a flawless budget load in NAV
Posted: January 21, 2013 Filed under: Uncategorized | Tags: budgets, Excel, export to excel, NAV, tips and tricks 1 CommentHopefully, you’ve completed your budget work for 2013 and all you need to do to finish is to load all that information to NAV so you can begin to report against your actual financial numbers. If you’ve done this before, you might already know that NAV’s budget tool can be a bit fussy and also a bit cryptic about why it won’t accept your carefully prepared data. Here are four quick tips to help you with getting that data into NAV quickly, correctly, and in one try.
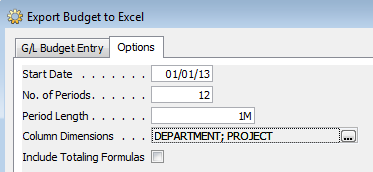
1. Export first, then import. This is the single most important detail about getting budget data loaded into NAV. You can choose to export an existing budget or even choose to export a blank new budget. Exporting a budget as your first step establishes a working template you can populate your data into, including dimensions. As long as you start with this template, you are already most of the way there to a successful NAV budget load.
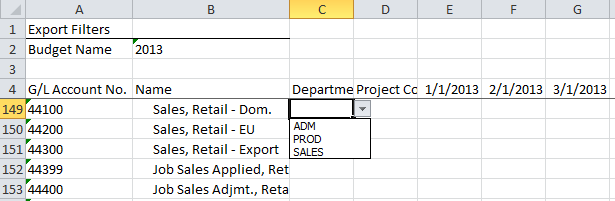
2. If you’re using dimensions, validate your data against the provided drop downs. Make sure all budget lines that use dimensions are only using valid dimension names. Any deviation from the allowable values that already exist in NAV can cause your budget load to error out or load without balancing.
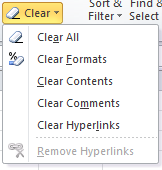
3. Clear the formats from your numbers. Once you’ve copied and pasted or typed your numbers into your Excel template, use the Excel “Clear Formats” function on all cells that contain a numeric value to make sure they are all returned to a formatted status of general. NAV does not accept any other format than the one in the template, and use of other formats, including use of commas in the numbers, will cause the budget tool to give an error and keep you from loading your budget successfully.
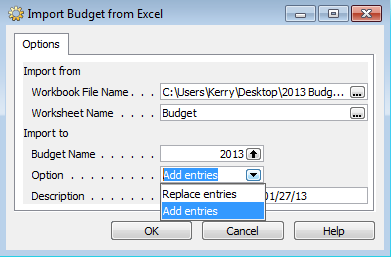
4. Use the “Add Entries” option for a brand new budget load and the “Replace Entries” option for a subsequent version. The add entries option should only be used for a brand new budget load, otherwise the entries will be added on top of the already existing entries, doubling or tripling them. If you need to load a second or third version or some type of correction, always use the replace entries option instead of the add entries option. If you really get stuck with a bunch of errors, the best thing you can do is delete your budget and reload from scratch.
Take one last look through your data to make sure it’s accurate and exactly what you expected. You can use the budget tool to do this, or even better, put together a quick account schedule that shows your entries using “G/L Budget Entries” instead of “G/L Entries”. Make sure to look at your total balances, balances by fiscal period, and balances with dimension filters applied. Once you’re satisfied that all your budgeted data has loaded correctly and completely, you’re ready to produce financial reporting showing actual versus budgeted numbers!
This posting is one of the Top 20 Most Viewed in the last year! Follow this link to see the entire list.
Learning about Microsoft Dynamics NAV 2013
Posted: November 12, 2012 Filed under: Uncategorized | Tags: Convergence, Dynamics, ERP, learning, Microsoft, NAV, NAV 2013, NAVUG, training, upgrading, user group Leave a comment My company has started seriously discussing what we’re going to do about upgrading our NAV ERP system. With NAV 2013 released to market in October, we’ve got plenty to talk about. Of course, just like you and your companies, we’re nailing down exactly what the benefit of upgrading will be to our company specifically. We’ve talked about performance improvements and greater ability to get to data needed for reporting, but some of those concepts can get pretty intangible in these beginning discussions.
We’ve already talked about the big concepts, but what people really want to know about right now are the real concepts: exactly how will an upgrade in the software increase our productivity, make us more efficient in our jobs, and ultimately, help us to drive revenue, decrease costs, or increase cash?
So, I’m beginning to gather ways to start to show people at my company, in a tangible way, what the upgraded version can do for them. Here’s where I’m at so far:
1) Get groups of stakeholders to start to attend webinars about NAV 2013. I’ve had to chance to attend Microsoft Convergence and see all this stuff, they haven’t. I need to get them exposed to seeing this incredibly different version and what it can do for them. One way I’ll do this is to have them attend webinars sponsored by the NAV user group, NAVUG. They’ve got one scheduled called “A Guided Tour of NAV 2013”, and I’ve got a group organized to attend already. I’m betting we’ll see quite a bit of material about NAV 2013 from the user group in the next year. One of the best things about the user group webinars is that they’re recorded, so if we want to review the webinar later, anyone in my company has that option.
2) Learn as much as I can about the nitty-gritty details so I can promote them in a real way. I’m constantly searching the web (seriously, I “Bing” everything) for new information about just about anything. Right now, I’m focusing on NAV 2013. I just found a great YouTube video, “What’s New Dynamics NAV 2013 – User Productivity Enhancements“. In six quick minutes I got about five takeaways that I can start to use. My favorite? NAV 2013 has improved error messages to help end users resolve problems. I’m going to take this info back to work with me and make sure people know we could have less help desk traffic because the new NAV version makes it a lot easier for end users to solve their own errors on the spot.
3) Get a test copy of NAV 2013 installed so I can start to play around with it myself. I’ve done this with previous versions, so now it’s time. I can get a demo copy installed and start touring the menus, trying things out, and teaching myself how to use the new version. What’ll I try out first? I can’t wait to get my hands on the cash flow forecast! Once I’ve got some level of mastery of the new version, I can start showing folks what improvements will apply to them personally, in their jobs.
I’ll keep posting here as I find useful things to share with you. Hopefully, as you begin your process to discuss the upgrade plan for your company, you’ll find some ideas on things that’ll work for you and your companies.
This posting is one of the Top 20 Most Viewed in the last year! Follow this link to see the entire list.
Aging methods in NAV – which buckets are you looking for?
Posted: October 30, 2012 Filed under: Uncategorized | Tags: accounts payable, accounts receivable, aging, aging method, bucket, document date, due date, invoice date, NAV, overdue, payment terms, posting date, tips and tricks, transaction date Leave a comment When running any type of financial report, it’s important to ask the right question in order to get the right answer. When running your accounts payable or accounts receivable aging reports, it’s especially important since there are three available options that will give you the same total answer but will break your transactions down into different aging bucket categories. Choosing the correct option for the question you actually want to answer is the key.
Question #1: How overdue is the invoice?
By choosing the Aging Method of Due Date, you are asking NAV to age each bucket on your aging in intervals based on the Due Date of the invoice. Remember the due date is based on a calculation that applies payment terms against the document date of the invoice.
Question #2: How many days have passed since the invoice was posted?
By choosing the Aging Method of Transaction Date, you are asking NAV to age each bucket on your aging in intervals based on the Posting Date. This is sometimes confusing to new users since on both the purchase and sales invoice forms, the two available dates are posting date and document date. The posting date should always be the date you want to post the invoice to your books and therefore the fiscal period the invoice will report in. For the purposes of your aging reports, posting date is equivalent to transaction date.
Question #3: How many days have passed since the vendor billed us – or – since we billed the customer?
By choosing the Aging Method of Document Date, you are asking NAV to age each bucket on your aging in intervals based on the Document Date. This one makes a little more sense to folks because at least the terms are the same. But darn us accountant types, we often call the document date the invoice date when we’re referring to it. Basically, this date should be the date your vendor has provided on the invoice, or from the customer side, the date you shipped and therefore the date you provided on the invoice to the customer. Any payment terms defined on the account will use the document date to calculate the due date.
An example of two invoices shown with all three aging methods
In a perfect world, our posting dates and document dates would all be the same. Let’s pick a perfect example with posting date of 11/01/10 and document date of 11/01/10 and payment terms of Net 21. This would calculate a due date of 11/22/10 on this invoice.
Then let’s pick an imperfect example. Let’s pretend someone at our company turned in that 11/01/10 invoice sometime in December, after the November books were closed. We still need to book this late invoice, so we’ll choose a posting date of 12/01/10, but since it was not the vendor’s error, we’ll use their invoice date of 11/01/10 in order to calculate the payment terms correctly.
Now, let’s look at an aging as of December 15th, 2010, all three ways. Take note that for all three methods, the balance due is exactly the same. The differences appear in how the aging buckets are defined and how transactions age into the different buckets.
Aging Method of Due Date
Key difference here is the aging buckets start calculating at the due date, so you’ll see column headers of current, up to 30 days, 31-60 days and over 60 days only when using this aging method.

Aging Method of Transaction Date
This aging is based on the posting date, the date that corresponds to the fiscal period you posted the invoice in. Note the late invoice with a 12/1/10 date shows as current.

Aging Method of Document Date
This aging has the same buckets as the one run with transaction date, but is based on the document date or invoice date.

This posting is one of the Top 20 Most Viewed in the last year! Follow this link to see the entire list.
Tis the (Budget) Season! Three handy NAV account schedule tips to get you through
Posted: October 23, 2012 Filed under: Uncategorized | Tags: Account Schedules, budgets, column layout, NAV, row setup, tips and tricks Leave a comment I don’t know about your company, but my company is in full budget preparation mode. We’re working on getting our sales forecast and operating budgets put together in time for the end of year. Like most companies, we’re working on this predictive tool while we’re in the midst of finishing out the year, so of course, we get to make a few assumptions on how the year will end up. I don’t have a crystal ball, but I do have some pretty great account schedules that help folks at my company get a good solid look at where we ended up last year, what we planned for this year, and how we’ve done over a couple of years, and I’m going to share those three account schedule column layouts with you today. Hopefully these simple setups will give you some quick ways to wow your company and make their budget construction process easier.
Tip 1: Show 12 months of actual data
We ask our budget managers to give us a twelve month prediction, why shouldn’t we give them twelve months of data to work with? No matter what month you’ve just closed, you can quickly put together an account schedule that shows all of the completed months for the year (in this case, January-September) as well as October/November/December of the prior year. This way, if your activity is generally the same year over year, budget managers can get a quick gauge from this setup. Keep in mind this column layout isn’t dynamic, so it’s not a true rolling twelve months. For budgeting purposes, it’ll get you what you need.

Tip 2: Show 9 months of actual data and show what the plan is for the last three months of the year
Another way to provide a projection for the year is to show all the completed months for the year (again, January-September) and then show the budgeted plan for October/November/December. This method shows actual activity as well as three months of planned activity in order to project the total for the year. If activity this year is significantly different (higher or lower) from the year prior, you might depend on this view instead.

Tip 3: Show a whole bunch of history at a high level
Especially for sales forecasting, it sometimes gets difficult to look at too much data at once. One way to get past data analysis overload is to provide a few years’ worth of annual data. This column layout will give four years of data, helping you to compare not only year over year, but multiple year trending in your data.

All three of these tips should give you a few additional tools to help you make sense of a whole lot of data. They can be applied to almost any row setup you have whether that setup is related to revenue or expenses. If you’re looking for more formulas, visit the account schedule formulas page.
Happy Budgeting!
This posting is one of the Top 20 Most Viewed in the last year! Follow this link to see the entire list.
Challenge to the NAVUG Community: NAV Account Schedules formulas cheat sheet
Posted: October 15, 2012 Filed under: Uncategorized | Tags: Account Schedules, challenge, cheat sheet, formulas, NAV, NAVUG, NAVUG Academy, tips and tricks, user group Leave a comment I had the opportunity today to teach a full day class on account schedules to an amazing engaged group of people! I get the privilege of doing this in person once a year at NAVUG Forum thanks to NAVUG Academy. In the last year, I’ve branched out to teach this same class in webinar format, and boy has it been a blast. The number one question I get is, “Do you have a cheat sheet for all the formulas you can use in Account Schedules?”
I’ve shied away from this in the past, because it’s a complex question. You’ve got to take into account comparison period versus comparison date, column type used, use of filters, and like all Microsoft products, there is often more than one way to accomplish the same result. But I think I’ve got us a start with the page I’ve just put out on my blog.
I believe the power of community is an amazing thing. We continually make each other better by sharing information.
I CHALLENGE YOU TO SUBMIT A COMMENT WITH AN ACCOUNT SCHEDULE FORMULA THAT’S NOT YET BEEN LISTED.
As long as I can test it to prove it works in the way described, and it’s different enough from already listed formulas, I’ll add it to the list and make sure to put a shout out to the contributor on the blog.
I’m looking forward to seeing what our amazing NAVUG community can accomplish!


Expand your use of dimensions in NAV account schedules by using analysis views
Posted: October 2, 2012 Filed under: Uncategorized | Tags: Account Schedules, analysis views, budgets, Classic Client, codeunit 410, column layout, date compression, dimensions, Dynamics, Microsoft, NAV, row setup, RTC, update Leave a commentIf I had to pick only three basic elements to Microsoft Dynamics NAV account schedules, I’d have to choose row setups, column layouts and analysis views. Of course, row setups give you access to basic general ledger accounts and column layouts give you options on how to show that data in different time periods. So what do analysis views do for us? Analysis views give us the ability to reach into our dimensions, past the two globals, and into the list of shortcuts, allowing us to combine any four dimensions we want at a time in any account schedule.
For illustration, I’m showing you an account schedule from NAV2009 Classic, which shows the dimension filters on an account schedule where no analysis view has been applied. The two global dimensions for CRONUS USA (Department and Project) are available to be selected on the dimensions filter tab and the remaining options are greyed out, unable to be used.

By selecting a different analysis view on the account schedule name page, you will have expanded options. Perhaps you’d like to apply an entirely different set of dimensions filters to your account schedule or limit the dimensions filters to only two of your shortcut dimensions. Any combination of four dimensions is available to you through analysis views.


There are a few things you need to know about analysis views before you start using them:
You can add a default analysis view to any account schedule. If you always want a certain account schedule to filter on a selected group of dimensions, this is the best way to do this.

Analysis Views must be updated. You can do this at any frequency you wish. Some companies choose to update once a month, some companies update once a day. Be aware that the process of updating pulls in any transactions that have been posted since the last update to your analysis view. This means if you post some entries during your close process, you’ll need to update your analysis view in order to show the change on your account schedule.

Updating can be done manually or it can be automated. To manually update analysis views, just hit the update button. You’ll need to do each one separately. Alternatively, you can choose to schedule codeunit 410 Update Analysis View as a regularly scheduled maintenance item in order to automate this process.
When you set up an analysis view for the first time, it can take a long time to update. Depending on the size of your database, if you don’t limit how far back your update goes, it could take a long time to update initially. Be careful by trying this out in a test system first. This process, which will normally take seconds when run daily, will take many hours if you don’t limit it and will cause table locks for other users.
If you test out an update and are afraid it will take up too much processing time, you have a couple of options. First, you can limit the start date of your update. One reason you might need a new analysis view is because you’ve added a new dimension. In this case, you really don’t need to go back to the beginning of time on your update. Choose the date you started gathering data on your new dimension as your starting date. You can also choose date compression. By compressing your data by day, week, month, quarter, period, or year, you limit how much detail you can see when you drill down. If you use this option, you’ll need to remember that this is a compressed view if you change column layouts to different time frame than your compression setting. Choosing date compression of none will allow you to drill down to full transactional detail.
Avoid using the update on posting button. This option updates your analysis view every time you post something to your system. Every sales order, every sales tax entry, every cash receipt, etc. will update real time. I’ve seen one small company use this option and it brought their system performance to a crawl.
Remember to include your budgets. If you make any changes to your budgets, you need to update that information on your analysis views as well.

Business Intelligence and Reporting Track helps solve user challenges at NAVUG Forum.
Posted: September 24, 2012 Filed under: Uncategorized | Tags: analysis views, business intelligence, Dynamics, JET, Microsoft, NAV, NAV 2013, NAVUG, reporting, RTC, user group Leave a commentJason Chance, Senior Programmer/Analyst at Seventh Generation and Business Intelligence and Reporting Track Leader for NAVUG Forum, guest blogs today on what the BI and Reporting Track has to offer end users at NAVUG Forum, the annual NAV end-user conference held in Seattle, October 15-18 2012.
 Without fail, whenever I lead a NAV roundtable discussion or training class, people talk about the reporting. I’ve only met a handful of people who are completely happy with their business reporting and most of them have spent significant resources developing reporting solutions outside of NAV. But before you throw in the towel on reporting in NAV, and spend a lot of time and money, you owe it yourself and your organization to understand what’s available in NAV. This is where NAVUG Forum 2012 comes in.
NAVUG Forum is an excellent event led by NAV users and professionals. It’s not a sales pitch. It’s not a glossy brochure full of fluff. It’s real NAV users sharing their experience and insight gained through years working with NAV. In the reporting and BI track we’ll focus how you can get the most out of the existing tools in NAV. With sessions like Reporting 101 and Reporting 102, you’ll learn how to create and modify NAV reports. Sessions on the Role Tailored Client will show you how to use the RTC to customize the data that you see in NAV. The Analysis Views and Jet Reports session will highlight two often under utilized reporting tools in NAV. The NAV 2013 sessions will give you a preview of what to expect in the newest version of NAV.
If you have issues and concerns with your reporting capabilities, chances are someone else has the same concerns, who knows, maybe they’ve already solved their problems. Come to NAVUG Forum, learn from your peers, build a network of colleagues that can help you get the most out of NAV.
See you in Seattle.
Microsoft’s concept of how 2019 will look like
Posted: September 21, 2012 Filed under: Uncategorized | Tags: Dynamics, Kinect, Microsoft, NAV, video demo 1 CommentMicrosoft Dynamics NAV users have already gotten the chance to see Jesper Lachance Raebild’s video demo using Microsoft Kinect in a NAV manufacturing environment. If you missed it, find the link to the video here.
What else does Microsoft have in store for us? Take a five minute break to see what 2019 could look like.

The NAV accountant’s little helper: the reconciliation account check box
Posted: September 18, 2012 Filed under: Uncategorized | Tags: balance after posting, Classic Client, general ledger, journal entry, NAV, net change, posting test report, reconciliation account, RTC, tips and tricks Leave a commentThere’s a tiny feature in NAV that I take for granted. It’s there, in the background, hiding in the setup, and it helps me out just a little almost every time I make a manual journal entry. Especially if I’m in a bit of a rush, or distracted, this option gives me one more quick but effective look at what I’m doing before I commit a journal entry to my books permanently. This nifty little thing can be added to your NAV setup at any time without any help from IT and won’t require any maintenance. The option I’m talking about is the Reconciliation Account check box you can find on your general ledger account card. Here’s where you can find it:
Role Tailored Client

Classic Client

For any account where you’d like this additional double check, check the Reconciliation Account box found on the General Ledger Account Card. Now go put together your journal entry.

Instead of posting directly from the entry, choose Actions=>Posting=>Test Report=>Preview (if you’re RTC) or just choose Posting=>Test Report=>Preview (if you’re Classic). NAV will put together a handy dandy print preview which will now include a section at the bottom labeled Reconciliation. This little section will show you which direction your entry is going in, what sign your ending balance will be, and what the actual balance after posting will look like. This all happens before you commit it as final to the system. This may be just the extra bit of help you need in order to keep you from making an error. If you like what you see, post that journal entry!

If you have an account where you’ve got a lot of daily activity, you may not find this as useful as you do with accounts with just a little bit of activity throughout the month because you’ll have a more frequently changing end balance. Decide what might be useful to you.
Next time you do a journal entry, give it a try. Go to the account card and check the box. Make your journal entry. Before you post, run the posting test report. Is the net change in your journal entry going in the right direction? Did you enter the correct account? Is your ending account balance the right sign? Most importantly, is the balance after posting what you expected? This little helper can give you a quick preview before you hit post and save you from having to reverse and correct an entry.
This posting is one of the Top 20 Most Viewed in the last year! Follow this link to see the entire list.
")

