NAV AS 101 Lesson 6: Row Setup
Posted: April 29, 2014 Filed under: Uncategorized Leave a commentThe row setup is the area of the report where you’ll show either single general ledger accounts or groups of general ledger accounts. If you imagine a trial balance, the rows of a trial balance correspond to single general ledger accounts. The row setup of an income statement would be an example of where you might use groups of general ledger accounts.
The perpetual problem of the new NAV user is when you get started in a new area of the application, there are way too many options to choose from. How many times have you opened up a new menu option, only to find twenty or more columns displayed as the default, and many more lurking behind the show columns menu? While we appreciate having all options for all people at some point, new users can find this especially daunting when trying to just get started with something new.
I’ll show you which columns to choose in the row setup for account schedules as a beginning point, and go through some simple explanations of how they are used.
Fields for beginning users of account schedules:
Row No. – The row number is completely optional, but highly recommended. This simple element of the row setup will eventually be one of the key features of your account schedule, allowing you to calculate and organize with ease.
Description – This is the one place you have to communicate, in words, what you’re showing on each line of your report.
Totaling Type: Posting Accounts or Formula – This field tells NAV what you’re going to do here. You’re either going to pull data from your general ledger posting accounts or calculate a formula.
Totaling – Which general ledger accounts you want to pull or what formula you want to calculate.
Row Type: Net Change or Balance at Date – The key here is knowing what type of accounts you’re reporting on. If you’re using income statement accounts (Revenue/Expense), then you need to use net change. If you’re using balance sheet accounts (assets/liabilities), then you need to use Balance at Date.
Shown below are both the design view and the user view of a summarized income statement, showing the use of these five options.
Role Tailored Client / 2013


Classic Client


Fields for experienced users of account schedules:
If you’re looking for what else you can do with Microsoft Dynamics NAV row setups, then this is where you want to be. Keep reading to understand each and every field available for account schedule row setups. The functionality of these fields are exactly the same between the Classic and Role Tailored Clients unless specifically noted. The only difference is in how they look on the screen and how you navigate between screens. Take a look at the pictures below to find the look you’re familiar with, but then keep reading for the explanations of what these fields will do in your financial reporting.
Role Tailored Client / 2013
This is a view of what I recommend you start with for basic row setup options.

This is a view of all available row setup options.

Classic Client
This is a view of what I recommend you start with for basic row setup options.

This is a view of all available row setup options.

Row setup options – apply to both clients
Row No. is completely optional, but highly recommended. This simple element of the row setup will eventually be one of the key features of your account schedule, allowing you to calculate and organize with ease.
Description is the one place you have to communicate, in words, what you’re showing on each line of your report.
Totaling Type: 10 options to choose from
- Posting Accounts pull data from your accounts designated as posting accounts on the G/L Account Card Account Type field.
- Total Accounts pull data from your accounts designated as a total or as an end-total on the G/L Account Card Account Type field.
- Formula allows you to calculate a basic formula on this row.
- Underline places a single underline.
- Double Underline places a double underline.
- NOTE: This nifty addition showed up with NAV 2009 R2. If you are NAV 2009 SP1 or earlier, this won’t be available to you.
- Both of the underline functions are there to give folks who print account schedules directly out of NAV some formatting options. If you’re exporting to Excel you’ve got some better format options to work with than these.
- Set Base for Percent allows you to designate which row from your row setup will be used as the beginning point for a section to be included in a percent of total calculation. This feature showed up in version 5.0 and must be used together with a formula on another row to designate the end point of the section as well as some setup in the column layout. It’s a little fussy in the setup and inelegant in execution, but is still effective to get those vital comparative percentages onto your account schedules.
- Cost Type and Cost Type Total *New with NAV2013* These are new functions related to the posting accounts and total and end-total accounts from the chart of cost accounts.
- Cash Flow Entry Accounts and Cash Flow Total Accounts *New with NAV2013* These are new functions related to the posting accounts and total and end-total accounts from the chart of cash flow accounts.
Totaling will be which general ledger accounts you want to pull or what formula you want to calculate, depending on what you selected in totaling type.
Row Type: 3 options to choose from
- Net Change should be used, generally, if you’re reporting on income statement accounts (revenue/expense).
- Balance at Date should be used, generally, if you’re reporting on balance sheet accounts (assets/liabilities).
- Beginning Balance will be sparingly used, but you’ll want this for your statement of cash flows at some point.
Amount Type gives you three options: Net Amount, Debit Amount and Credit Amount. You’re going to use Net Amount almost all the time, but I suppose if you were getting very granular in your account schedules and perhaps using them for detailed reconciling reports, this might be useful. If I’m getting down to this level of transactional detail, I’m usually going to the chart of accounts instead of account schedules.
Formatting Fields: Bold, Italic, and Underline These basic formatting fields are there to allow you to emphasize some of the rows of your account schedules. When you select these options on any row, the whole row is effected. You are not able to effect a single “cell” for formatting. What’s the difference between underline here and underline found in the Totaling Type options? You can get a more snug fit on your underline using this option since it appears in the same row of your data instead of in a row if its own.
New Page inserts a page break. This is commonly used when separating the pages of the balance sheet showing assets on the first page and liabilities and equity on the second page. I have also seen it used when folks build multi page account schedules.
Show Opposite Sign is the option you can select to change revenue credit balances or expense debit balances to the opposite sign for the purposes of presenting this data in a more non-finance friendly manner. No salesperson wants to see sales presented with a negative sign; use this to change that credit to a positive number on your reporting.
Show allows you to designate if a row will show (the default) or be hidden on the printed account schedule only. You can click this box as much as you want, but your rows will still show on-screen or when you export to Excel. If you print directly out of account schedules, this feature will work very well for you.
Dimension Totaling is the last option available and you might have noticed that I didn’t show them on pictures above. This is because they are unique for just about every user, and depending on your analysis view setup, may even be different from schedule to schedule. You can use just one, or you can use all four of the available dimension totaling fields, in whatever combination you like. These fields act very much like the Totaling field because this is where you will tell NAV what Dimensions you want shown and totaled from your general ledger accounts.
This posting is part of the NAV Account Schedules 101 series. Find the entire list of lessons here.
Don’t forget to visit the Account Schedule Formulas and Account Schedule Examples pages if you’re looking for even more ideas on how to improve your financial reporting using account schedules with Microsoft Dynamics NAV.
Week Two Recap: Account Schedules 101
Posted: April 25, 2014 Filed under: Uncategorized Leave a comment Here’s the week 2 recap on the NAV Account Schedules 101 series. Follow the links below to view the posts for each of the lessons we covered this week or view the entire series here.
NAV AS 101 Lesson 4: Basic Elements of Account Schedules
NAV AS 101 Lesson 5: Getting Started
BONUS WEBINAR – I did a repeat of a NAVUG sponsored Convergence session from this last March titled, “Basic Financial Reporting with Account Schedules”. The one hour session covered some account schedule basic concepts, but also shows how to look at an income statement nine different ways with live demonstrations done in a NAV2013 database. The webinar is recorded and will be available for viewing out on Collaborate if you have a premium NAVUG membership. I’ll update the link here once the recording is available.
Don’t forget to visit the Account Schedule Formulas and Account Schedule Examples pages if you’re looking for even more ideas on how to improve your financial reporting using account schedules with Microsoft Dynamics NAV.
NAV AS 101 Lesson 5: Getting Started
Posted: April 24, 2014 Filed under: Uncategorized Leave a commentIf you are just getting started with account schedules, you need some basic information to get going. This post will show you where to find account schedules in NAV, how to create a new one, and how to name them. We’ll cover both the Role-Tailored Client (RTC) as well as the Classic Client.
Where can you find them?
If you’re using NAV with the RTC in either NAV2009 or NAV2013, one way to find account schedules is to choose Departments, then General Ledger from the Financial Management menu, then choose the Account Schedules link under the Reports and Analysis and Analysis & Reporting menus.

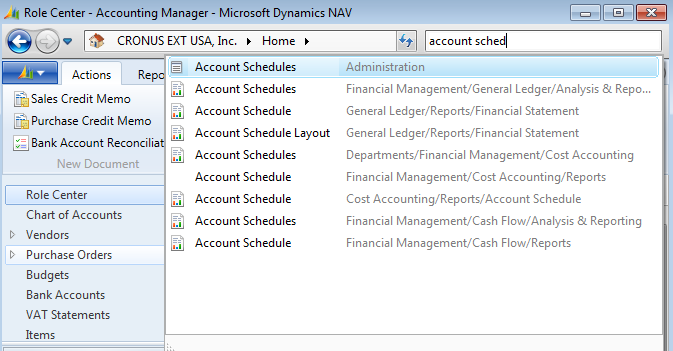
A faster way is to simply use the Search option. Type in the word account schedules, and you’ll see a few suggestions. For now, choose the second one on the list that you see here.
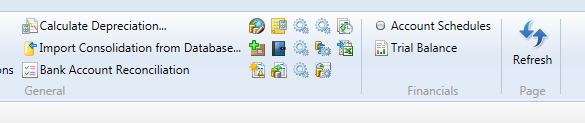
If you’re going to be using account schedules frequently, an even better way is to create a button on your ribbon. This way gets you there in a single click.
If you’re using NAV 2009 and prior versions with the Classic Client, choose Financial Management=>General Ledger=>Analysis & Reporting=>Account Schedules.

How do you create a new account schedule?
In the RTC, creating a new account schedule is made easy with the New button located on the action pane. If you’re a keyboard shortcuts person, you can use Ctrl-N, or if you prefer to use menu options, go to Actions=>New.

In the Classic Client, use F3 to create a new record for the account schedule, or select New from the Edit menu.

How do you name a new account schedule?
Once you’ve created a new report using the RTC, you’ve got 10 characters available for the Name field, and 80 characters available for the Description field.

The classic client has the same parameters.

Both clients will allow you to use any combination of numbers, letters, or special characters.
Keep in mind, that regardless of whether you are using RTC or the Classic Client, the names you use for the description field will be the default names used when you print account schedules directly out of NAV.
This posting is part of the NAV Account Schedules 101 series. Find the entire list of lessons here.
Don’t forget to visit the Account Schedule Formulas and Account Schedule Examples pages if you’re looking for even more ideas on how to improve your financial reporting using account schedules with Microsoft Dynamics NAV.
Account Schedules webinar on Wednesday April 23rd 1pm ET
Posted: April 22, 2014 Filed under: Uncategorized Leave a comment I’m presenting a webinar tomorrow on account schedules through the NAVUG. The webinar is a repeat of a session I did at Microsoft Dynamics Convergence this year and covers some account schedule basics in the beginning, but spends most of the hour long session on live demos showing nine different ways to look at an income statement using account schedules.
This is a premium event from NAVUG, which means you’ve got to have a paid membership to attend the webinar or view the recording, which will be available on Collaborate in about a week.
http://www.navug.com/events/04232014

NAV AS 101 Lesson 4: Basic Elements of Account Schedules
Posted: April 22, 2014 Filed under: Uncategorized Leave a comment There are three foundational concepts you must understand in order to use account schedules to their full potential.
1. Row setup
The row setup is the area of the report where you’ll show either single general ledger accounts or groups of general ledger accounts. If you imagine a trial balance, the rows of a trial balance correspond to single general ledger accounts. The row setup of an income statement would be an example of where you might use groups of general ledger accounts.
2. Column layout
The column layout is where you will define periods of time to be used in your reports. Most financial reports are showing us some period of time compared to the data (in this case, general ledger accounts) we are reporting against. Common column layouts may be current month versus year to date, or a twelve month net change (income statement accounts) or twelve month balance (balance sheet accounts). You can apply any column layout you design against any of the row setups you design. As a result, most NAV account schedule users end up with many more column layouts designed than row setups.
3. Analysis views
Analysis views are the element of account schedules that lend flexibility and power to your account schedules by accessing your dimensions. Account schedules can always use the two global dimensions you have set up even if you aren’t using analysis views. Once you start using analysis views, you can get to the shortcut dimensions you have defined. When using analysis views, you can access many combinations of any of your dimensions, but you are limited to only four at a time. By setting up multiple analysis views in different groupings, you can set up almost any combination you can think of to produce your financial reports using any of your defined dimensions.
There are all kinds of ways to expand on these three foundational concepts, but let’s start with these simple concepts first before we talk more about additional things you can do with row setups, column layouts, and analysis views.
In addition, you need to understand three other concepts in order to use account schedules in the most efficient way possible. Mastering these three concepts will allow you to build and utilize account schedules quickly and easily.
4. Printing or exporting to Microsoft Excel
You have the option of either printing account schedules directly out of NAV or exporting them to Microsoft Excel. I recommend learning how to use the export to Excel update option so you can easily and quickly export your account schedules every month by using a pre-formatted Excel “shell”. The shell only needs to be created the very first time. Then, each time you update your reports, you only need to update the numbers – there is no need to update the formatting each time.
5. Formulas
There are two types of formulas used in account schedules. The first type are basic mathematical formulas, generally based on row number references, that allow you to do simple calculations against your data. These are used in both the row setup and the column layout.
The second type are formulas which are only used in the column layout and are based on comparison period or comparison date fields. Most users find getting used to the conventions of these fields difficult as they are not intuitive at first. I’ve got three suggestions to help with that: 1) use the NAV help menu to look at “comparison period formula” and “comparison date formula”; 2) get in there and play around – you’re not going to hurt anything, and if you know what numbers you should have, you’ll figure it out after some experimenting; and 3) use the account schedules formulas page from this blog. I developed the account schedules formula page because the number one request I have gotten in all my account schedules classes is for a cheat sheet of account schedule formulas.
6. Manipulating the matrix
The largest change between Classic NAV versions (NAV2009 Classic, 5.0, or earlier versions) and Role Tailored Client NAV versions (NAV2009 RTC, NAV 2013, and future versions) is the development of the matrix. The new matrix allows for a whole lot of functionality that we just didn’t have before which makes account schedules a little more Excel-like for many users. If you used one of the Classic versions previously, you’ll find the navigation pathways of RTC versions are significantly different and can take some getting used to. Microsoft did not do a great job with account schedules in the NAV2009 RTC version – there are some things there that are clunky, non-functional, and cumbersome. The good news is they fixed all those problems with NAV2013 and threw in some additional features on top of it, making account schedules even better with that version.
This posting is part of the NAV Account Schedules 101 series. Find the entire list of lessons here.
Don’t forget to visit the Account Schedule Formulas and Account Schedule Examples pages if you’re looking for even more ideas on how to improve your financial reporting using account schedules with Microsoft Dynamics NAV.
Week One Recap: NAV Account Schedules 101
Posted: April 18, 2014 Filed under: Uncategorized Leave a commentHere’s the week 1 recap on the NAV Account Schedules 101 series. Follow the links below to view the posts for each of the lessons we covered this week or view the entire series here.
NAV AS 101 Lesson 1: Why do I use Account Schedules?
NAV AS 101 Lesson 2: Am I anti add-on?
NAV AS 101 Lesson 3: Where else can you learn about Account Schedules?
Don’t forget to visit the Account Schedule Formulas and Account Schedule Examples pages if you’re looking for even more ideas on how to improve your financial reporting using account schedules with Microsoft Dynamics NAV.
NAV AS 101 Lesson 3: Where else can you learn about Account Schedules?
Posted: April 17, 2014 Filed under: Uncategorized Leave a comment If you’re reading this, you are probably looking for answers now, as in “my implementation goes live in a month and I don’t have my financial statements figured out yet”. This is by far the most common question I get from people looking for answers about account schedules.
Assuming you are already a Microsoft Dynamics NAV customer, and you’re current on your BREP (Business Ready Enhancement Plan) or other service plan, you need to go to CustomerSource to get access to e-learning modules and training manuals that are just waiting for you to find them. CustomerSource is Microsoft’s official site for user documentation and e-learning modules and your partner should have set you up with access and shown you how to use it when you purchased NAV for your company. If not, give your partner a call to ask them to get you set up now. The CustomerSource site has had a makeover in recent months, and my general impression so far is that the site looks better, but they still have a lot of work to do in making user documentation and e-learning resources easy to get to.
For the last three versions of NAV, here’s where you’ll find information about Account Schedules. As a quick tip for finding things, type in just the course number (ex. 80535) listed into the search function in order to get to what you need fast.
NAV2013 search for: 80535 Finance Advanced in Microsoft Dynamics NAV 2013 and 80440 Trade in Microsoft Dynamics NAV 2013
NAV2009 with the RTC (Role Tailored client) search for: Course 80050 Business Intelligence for Information Workers. You may also try Course 80258 Trade in Microsoft Dynamics NAV 2009 to expand into the topics of analysis reports and analysis by dimensions.
NAV 5.0 or below with the Classic client search for: Course 8875 Business Intelligence for Information Workers in Microsoft Dynamics NAV 5.0, Course 8939 Trade in Microsoft Dynamics NAV 5.0, and Course 8713 What’s New in Microsoft Dynamics NAV 5.0 Part I (chapter 8 talks about some of the improvements that were made to account schedules between version 4.0 and 5.0).
Choose documentation for the version that you are currently using since these resources will illustrate examples in screen shots that are familiar to you. If you’re not yet using the RTC, you don’t need to struggle through documentation shown in an interface that you’re not using yet. I’ll maintain that the basic functionality of account schedules is the same (so far), and the major difference between the Classic client and the RTC is navigation, as well as look and feel, of the new matrix.
Find the link to this wealth of information here. Remember, you’ll need to be logged in with the Windows Live ID that is associated with your company’s CustomerSource account.
This posting is part of the NAV Account Schedules 101 series. Find the entire list of lessons here.
Don’t forget to visit the Account Schedule Formulas and Account Schedule Examples pages if you’re looking for even more ideas on how to improve your financial reporting using account schedules with Microsoft Dynamics NAV.
NAV AS 101 Lesson 2: Am I anti add-on?
Posted: April 15, 2014 Filed under: Uncategorized Leave a comment Quite a few people have asked me if I’m anti add-on. The answer is, “No, I’m not anti add-on, I’m just really pro account schedule.” I believe account schedules can do whatever you need related to foundational financial reporting using NAV. If you are looking to produce your basic financial statements using the software you already own with no additional cost or separate tool, then account schedules are exactly what you need.
There are many more reasons for needing reporting other than financial reporting, and NAV does not fulfill all of these needs. If you are looking for a comprehensive Business Intelligence solution, Key Performance Indicators, Dashboards, sophisticated graphics, beautiful interfaces, or even operational reporting that reaches out to other areas of your ERP system before the information hits the general ledger, then account schedules are not the tool for you.
If you’re a Microsoft Dynamics NAV user, like I am, there are a whole ton of choices to make regarding financial reporting.
- Account Schedules, the native financial reporting package that reports on general ledger transactions.
- Analysis Reports, also a native NAV reporting option, that extends reporting to item ledger entries from the sales and purchasing tables.
- Object Designer, the native C/SIDE development tool used for the NAV application, which includes a report writer.
- SSRS (SQL Server Reporting Services), a Microsoft reporting tool package that uses the SQL programming language.
- PowerPivot, the free Microsoft Excel add-on that became available with Microsoft Office 2010, allowing data to load from NAV (and other data sources) through a direct connection to Excel.
- JET Express, a former ISV (Independent Software Vendor) reporting solution, released for NAV 2009 in 2011 as available for NAV users, and included with the Microsoft BREP (Business Ready Enhancement Plan), instead of as a separately purchased add-on solution.
- Management Reporter, released by Microsoft in 2012 as a free add-on for all Microsoft Dynamics ERPs with the caveat that, for NAV users, it is only available if you already had the licensing for FRx.
- Any large number of additional ISV solutions, sold as separately purchased add-ons to NAV.
As the Controller for my company, it’s my job to stay informed on what’s available and determine which choices are the best possible given the available skills sets of the employees who use them and the overall cost. It’s also my job to make sure I know what the future direction of the ERP software is, so I can advise on decisions we make as a company with that knowledge in hand.
I have to admit, I’m the kind of person who likes choices, and I’ve sampled every single option on the list above in one way or another. The reporting strategy for my company is based on three principles: 1) the report must balance to the general ledger, 2) it must be consistently replicated in future periods, 3) it must be able to be maintained by someone in the company with the right skill set.
Ultimately, my choice for foundational financial reporting, the reporting that I need to produce as a deliverable for my company each and every month, is account schedules.
This posting is part of the NAV Account Schedules 101 series. Find the entire list of lessons here.
Don’t forget to visit the Account Schedule Formulas and Account Schedule Examples pages if you’re looking for even more ideas on how to improve your financial reporting using account schedules with Microsoft Dynamics NAV.
NAV AS 101 Lesson 1: Why do I use Account Schedules?
Posted: April 14, 2014 Filed under: Uncategorized Leave a comment I use account schedules as the primary source of financial reporting at my company. With all the available choices out there, why do I use account schedules? I’ve got a whole list of reasons.
1) I can custom build all of my financial statements, exactly how I want to see them.
Especially when I talk with prospective NAV customers, I hear a lot of objections as to why NAV doesn’t come with “out of the box” financial statements. If you think about this for a bit, what part of your company’s financials will fit the definition of “out of the box”? Is your chart of accounts the same as someone else’s? What about the name of your accounts? Your numbering convention? Is the way you present your financial statements just like anyone else’s? If you built your financial statements using an out of the box solution, how long would it be before you began to customize them?
Why not build them the way you want them the first time and be able to customize them as your company changes?
2) Account schedules tie directly to the general ledger.
Someone told me once that reporting from the general ledger was the best way to get to the truth. Since my financial statements have got to be accurate and consistent above all else, I like this idea. I know, that without a doubt, my account schedules tie back to my trial balance and my detailed transactional postings. I can prove it out over and over. I can use my account schedules to debunk some of the untruths that come out of some of our other reporting sources. Knowing I can get to the truth makes me trust the results I get from account schedules and gives me confidence in deeming them as the place to get exactly the right answer.
3) Budgets integrate really well with account schedules.
I use the budgets area of NAV extensively. However, I only actually touch the budgets area once a year, when I populate them with our next years’ data. Budgets integrate to account schedules so fluidly that I have no reason to go back and forth between the two during the year as I track how we’re doing in comparison to budget or even as I look ahead to remind myself of what the plan was. I can get this information from account schedules and get all my financial information from one place.
4) Dimensions along with account schedules are a powerful combination.
Account schedules without dimensions are like James Bond without Q. James Bond can certainly hold his own without all the gadgets, but come on, the things that Q adds are really cool! Adding dimensions in almost as many combinations as you can think of gives you added power in your account schedules and lets you stretch beyond mere financial reporting and expand into operational reporting.
5) Drill downs
The drill down feature from account schedules is unsurpassed as a quick research tool. Any number you can produce in an account schedule that comes from the general ledger (instead of as the result of a formula) can get you to the source of the number by drilling down. That means you can find the exact source(s) of a highly summarized number whether it comes from an invoice or a journal entry, and you can track down where that number came from, when it happened, and even who the user was who created it.
6) They export easily to Excel.
My monthly financial statement package is 18 pages, all produced out of account schedules. Each month, I export directly to Excel and produce reports that are consistently formatted and look the same every month. I’ve got good control over the process while still having the flexibility I need when we decide we want to make a change. All of this gets loaded up to SharePoint for the end users who use them, and no tree products are harmed in the production of our financials.
7) Account schedules can be built and maintained by finance folks without IT help.
This is, and always has been, the big seller for me. I’m a DIY kind of person. I do my own landscaping, I bake my own bread (not all the time), I can build a fire while camping, and I painted my own living room. These same principles flow through to my business. I want to be able to do it myself. I love my IT colleagues, but goodness knows they have enough to do without having to produce my financials. Account schedules are easy enough to use that I don’t need to know a programming language, or how to accomplish a table join, in order to build them. All I need is knowledge of my chart of accounts, what the structure of my dimensions and budgets are, what the differences are between balance sheet and income statement accounts, and some simple formulas.
This posting is part of the NAV Account Schedules 101 series. Find the entire list of lessons here.
Don’t forget to visit the Account Schedule Formulas and Account Schedule Examples pages if you’re looking for even more ideas on how to improve your financial reporting using account schedules with Microsoft Dynamics NAV.
NAV Account Schedules 101
Posted: April 9, 2014 Filed under: Uncategorized 2 CommentsI’ve decided to give away my account schedule class material here on the blog in this Series: NAV Account Schedules 101. Check back to see what’s been added, or choose to follow the blog to receive email updates (or subscribe to the RSS feed), so you don’t miss any of these when they come out. Most examples and screen shots will be shown in NAV2013, but I’ll make sure to tie back any significant differences to 5.0 and NAV2009 Classic and RTC. The list of topics we’ll be covering is below and you’ll see two or three new ones come out every week until we’re through the whole list.
Don’t forget to visit the Account Schedule Formulas and Account Schedule Examples pages if you’re looking for even more ideas on how to improve your financial reporting using account schedules with Microsoft Dynamics NAV.

NAV AS 101 Lesson 1: Why do I use Account Schedules?
NAV AS 101 Lesson 2: Am I anti add-on?
NAV AS 101 Lesson 3: Where else can you learn about Account Schedules?
NAV AS 101 Lesson 4: Basic Elements of Account Schedules
NAV AS 101 Lesson 5: Getting Started
BONUS WEBINAR – I did a repeat of a NAVUG sponsored Convergence session from this last March titled, “Basic Financial Reporting with Account Schedules”. The one hour session covered some account schedule basic concepts, but also shows how to look at an income statement nine different ways with live demonstrations done in a NAV2013 database. The webinar is recorded and is available for viewing at this link out on Collaborate if you have a premium NAVUG membership.
NAV AS 101 Lesson 6: Row Setup
NAV AS 101 Lesson 7: Column Layout
NAV AS 101 Lesson 8: Formatting
NAV AS 101 Lesson 10: Comparison Period v. Comparison Date
NAV AS 101 Lesson 11: Filtering
NAV AS 101 Lesson 12: Drilling Down
NAV AS 101 Lesson 13: Printing Account Schedules
NAV AS 101 Lesson 14: Exporting to Excel
NAV AS 101 Lesson 15: Dimensions with Account Schedules
NAV AS 101 Lesson 16: Analysis Views
NAV AS 101 Lesson 17: Budgets with Account Schedules
NAV AS 101 Lesson 18: Account Schedules not balancing?
NAV AS 101 Lesson 19: Row numbering
NAV AS 101 Lesson 20: Sharing with your friends
NAV AS 101 Lesson 21: Account Schedule Bugs
NAV AS 101 Lesson 22: Dealing with Zeros
NAV AS 101 Lesson23: Copy and Paste
NAV AS 101 Lesson 24: When to change the sign
NAV AS 101 Lesson 25: What else can I do with Account Schedules?
")

