Week nine recap: Account Schedules 101
Posted: June 27, 2014 Filed under: Uncategorized Leave a comment Here’s the week 9 recap on the NAV Account Schedules 101 series. Follow the links below to view the posts for each of the lessons we covered this week or view the entire series here.
NAV AS 101 Lesson 21: Account Schedule Bugs
NAV AS 101 Lesson 22: Dealing with Zeros
NAV AS 101 Lesson23: Copy and Paste
Don’t forget to visit the Account Schedule Formulas and Account Schedule Examples pages if you’re looking for even more ideas on how to improve your financial reporting using account schedules with Microsoft Dynamics NAV.
NAV AS 101 Lesson 23: Copy and Paste
Posted: June 26, 2014 Filed under: Uncategorized Leave a comment The Copy and Paste function for NAV Account Schedules is a huge time-saver and anyone who designs reports for account schedules should know how to use this important feature. Let’s talk about the three main reasons why you would want to copy and paste an account schedule.
- Creating slightly different versions of a similar column layout. If I create a monthly net change column layout, I can easily create a monthly balance column layout, or a monthly budget column layout, simply by copying the original column layout and changing one variable on the new layout. Copy and paste allows me to create three valuable looks for one report in less than a minute.
- Testing or trouble shooting a new schedule. I’ll frequently take an existing schedule and change it to serve a different purpose. When doing this, I’ll copy the existing one that I know works, and then paste it into a new schedule to try what I want on it. This ensures I start with setup information exactly the same as the one I know works, so I don’t have to doubt whether I missed something. I can just change what I need for the new schedule and test the new variables one at a time.
- Section replication. If I have a schedule where I need a section to repeat, I can copy the existing one and paste it in the new spot.
Here are the different ways you can copy and paste with NAV account schedules.
- Copy and paste the whole darn thing! If you want to copy an entire row setup or column layout, select the blank gray box on the upper left of the screen (just to the left of Row No. and Description on your column headers) – this will cause your entire selection to turn blue. You can then select the Copy option or use Ctrl-C to copy the material. Go to the place you want to paste the selection and select the Paste option or use Ctrl-V.
- Just select a few rows. Maybe you just want to repeat a section instead of the whole thing. You can use your mouse to select the rows you want, then use the same techniques as above to replicate your blue highlighted selection.
- Take just a single field. One thing I show people quite a lot is that they can copy an account name when drilling down and paste it into the description field. Doing this keeps you from having to type it, and ensures it appears exactly the same as on your chart of accounts.
Bad news for those of you using NAV2009 RTC – you cannot copy and paste with NAV account schedules. The feature is back in NAV2013, but for those of you using 2009 RTC, you don’t have this time saver available to you and since Microsoft hasn’t issued a hot fix for it, it appears you’ve got to get to the next version to get this back.
This posting is part of the NAV Account Schedules 101 series. Find the entire list of lessons here.
Don’t forget to visit the Account Schedule Formulas and Account Schedule Examples pages if you’re looking for even more ideas on how to improve your financial reporting using account schedules with Microsoft Dynamics NAV.
NAV AS 101 Lesson 22: Dealing with Zeros
Posted: June 25, 2014 Filed under: Uncategorized Leave a comment Every numbers person needs to deal with zeros, and the most frequent thing we all do with zeros is to get them out of the way. NAV gives us very few ways to deal with this, but frequently the best way to get rid of zeros in account schedules is to do that task in Excel. Here are a few tips and tricks to help.
If you print account schedules directly out of NAV, you’ve got some great options. You can check the option found under Show in the row setup for If any column not zero. If this option is checked, the row will be suppressed if all columns have a zero value. Just like the other options on the show menu, this only affects printed account schedules and makes no change directly on-screen in NAV, either in the design view or in the overview.
There is an option in the column layout under Show where you can choose Never, but this isn’t directly applicable to the behavior of zeros. It is mighty handy if you want to hide a column whose only function is to perform a calculation that you don’t want shown.
If you are viewing account schedules on-screen, there is no way to hide zero values. If you’re looking in the design view or the overview, you will see rows that contain zero or no values and you can’t hide them.
If you are exporting account schedules to Excel, you’ve got some other options. These take a little setup, but will get the job done. If you want to consistently filter out zero values from your account schedules using Excel, here’s one way to do it: use filtering! I’ve got a report that I produce that has 50 rows on it. I regularly filter this report by dimensions, and any tab that is generated with a dimension can have the majority of lines with zero values, but it is not the same for each dimension. Each month, here is what I do:
1) Copy the prior month’s report and save as the current month’s report.
2) Remove all Excel filtering from each tab of the new report.
3) Export all the tabs I need from Account Schedules in order to update the numbers.
4) Go back into the new report that now has new numbers and apply an Excel filter to a column using the option to Select All and then uncheck the blanks or zero value option.
You’ll need to think through how you design your report in order to build in a column that would correctly indicate that a row with all zeros exists. One way is to insert a column that calculates the sum of all the other values and then format the numbers to show up as white text n Excel. That way you can then filter on those values when a zero or a blank occurs for all columns in a row in order to show only the the rows that have values in them.
This posting is part of the NAV Account Schedules 101 series. Find the entire list of lessons here.
Don’t forget to visit the Account Schedule Formulas and Account Schedule Examples pages if you’re looking for even more ideas on how to improve your financial reporting using account schedules with Microsoft Dynamics NAV.
NAV AS 101 Lesson 21: Account Schedule Bugs
Posted: June 24, 2014 Filed under: Uncategorized Leave a comment Just like any piece of software, there are some bugs in NAV account schedules, and the best way to deal with them is to know they exist. I’ll let the Microsoft folks debate whether these are a bug or not. To me, as an end-user, anything that removes a necessary feature or keeps a necessary feature from operating reliably without replacing it with something better is a bug.
Refresh Error in NAV Classic Account Schedules This bug causes the account schedule to come up blank when changing to a different account schedule. It can sometimes be partially remedied by scrolling up and down or left and right, but this sometimes only brings back some of the expected numbers. This is a refresh error that has existed for many of the Classic NAV versions. I’m really not sure how long it’s been there – I started using NAV with version 3.5 and I’ve seen this bug in that version as well as in 4.0, 5.0, and 2009 Classic. The best way to get past this one is to exit out of your account schedule and open it back up again. With the introduction of the matrix to account schedules in 2009 RTC versions, this bug (finally) went away.
Copy and Paste in 2009 RTC While the introduction of the matrix brought us some very nice things, it brought us one nasty disappointing bug – in NAV 2009 RTC versions, copy and paste cannot be used in account schedules. This has by far been the worst bug I’ve seen in NAV account schedules, and really is a huge loss of efficiency to users who have that version of NAV. I rarely get worked up about this kind of thing, but I did put a post out there explaining why this was such a big loss. There is no way to get past this bug other than to upgrade to the next version of NAV, NAV2013, where thankfully, copy and paste are returned to us.
Buttons that don’t work and filters that work but are super clunky in 2009 RTC There were a few other bugs in 2009 RTC that made this version of NAV the worst version ever for account schedule users. On the account schedules overview page, there were some mysterious buttons labeled as Next Set and Previous Set that don’t do anything. In addition, the filtering is terrible. Date filters always pick up the work date, don’t retain the date you were just using if you leave the screen and go back, and if you want to change the dates, you’ve got to type the entire date range, every time. There are no quick navigational buttons to move from one period to another. In addition, dimension filtering is difficult to get to and difficult to populate with the names of the dimensions you are using, in particular, if you use multiple analysis views. Luckily, every single of these bugs was fixed with the release of NAV2013.
To date, NAV2013 is by far the best version of NAV Account Schedules. It seems like Microsoft really got it right with a large number of capabilities related to the improved matrix, filtering, and navigation with account schedules, making it streamlined, intuitive and easy. Alas, NAV2013 is not perfect, and there are two bugs I’ve found. Unlike other versions, hopefully we won’t have to wait for a next release to see these ones fixed.
Refresh error in NAV2013 This one is a brand new and different type of refresh error than the one we saw in NAV Classic versions. When switching from an account schedule with many columns (let’s say a 12 month trended view) to an account schedule with fewer columns (let’s say an actual versus budget with variance), you’ll end up with a bunch of left over data from the 12 month view in the columns that are no longer a part of the actual versus budget view. There’s a quick and easy fix, which is to hit F5 or the brand spanking new Refresh button, and those pesky numbers will disappear. However, you’ve got to be on the watch for them and know what you’re looking at – a risk that’s not so great. As a NAV2013 user you’ll get used to using the F5/Refresh button frequently, so not a big deal, but I still don’t like any financial report showing up with numbers it shouldn’t.
Update workbook function no longer retains formatting in Excel when exporting account schedules with NAV2013 This one is a bigger deal and again, is a pretty big loss of efficiency for NAV account schedule users. Anyone who uses account schedules a lot should be using the export to Excel function all the time in order to product account schedules quickly and with consistent formatting. NAV2013 users can no longer do this and retain existing formatting. The update to Excel function still works in this version, but instead of just updating numbers in a formatted Excel worksheet, it dumps unformatted updated numbers into that worksheet, overriding the formatting you might have there. The recommended best practice is to continue to use the update worksheet function, but change one aspect of design of your Excel workbook. What you now need to do when you design your Excel workbook the first time are the following steps:
1) Use create workbook for any schedule to get an unformatted starting copy (Copy 1) of your schedule in Excel.
2) Copy this worksheet to another worksheet (Copy 2) and format it exactly like you’d like to see it.
3) Delete all the numbers out of Copy 2 and put in a link to Copy 1 that will pull all the numbers into Copy 2.
4) Hide the worksheet tab for Copy 1 so you only see the nicely formatted Copy 2.
5) When you update your Excel workbook the next time, only update the numbers to Copy 1. You will never update numbers to Copy 2. The links in Copy 2 will always pull forward from Copy 1.
I can’t say I’m especially looking forward to redesigning my 18 page financial statement package this way, but I’ll do it because now I have to. The one nice thing about this is I can get a little fancier with some of my formatting and won’t need to continue to tinker with some of the small things I do, like taking underlines out of column A and readjusting the width of column B, things I need to do universally in NAV2009 Classic because while the update workbook function keeps most of the formatting, it does override a couple of pesky things. So ultimately, this method will be faster on a monthly basis, but will take more design time and Excel comfort level, up front.
This might be a better solution for account schedules produced with many separate tabs for filtered dimensions. Imagine an Excel workbook with 20 tabs showing the same report, one for each dimension. Because we must use this new method, one way to make it more efficient will be to design a single report with the needed dimensions in each column. This report will go to the one hidden worksheet in the workbook and the 20 user facing tabs will be beautifully formatted reports that link only to the applicable column from a single report. So, for that example, this actually turns into a time saver since you don’t need to export/update each filtered dimension to a new tabbed worksheet.
One concern is that the linked formulas could become unlinked/deleted/moved, but this could be safeguarded by locking cells on the formatted worksheet to keep them from being accidentally changed. Another concern is that your account schedule could change and then the linked copy won’t show the error that is not being picked up. There are a few more things to watch for with this change in place, but there are some positives as well as negatives that go along with this bug.
This posting is part of the NAV Account Schedules 101 series. Find the entire list of lessons here.
Don’t forget to visit the Account Schedule Formulas and Account Schedule Examples pages if you’re looking for even more ideas on how to improve your financial reporting using account schedules with Microsoft Dynamics NAV.
Week eight recap: Account Schedules 101
Posted: June 20, 2014 Filed under: Uncategorized Leave a commentHere’s the week 8 recap on the NAV Account Schedules 101 series. Follow the links below to view the posts for each of the lessons we covered this week or view the entire series here.
NAV AS 101 Lesson 18: Account Schedules not balancing?
NAV AS 101 Lesson 19: Row numbering
NAV AS 101 Lesson 20: Sharing with your friends
Don’t forget to visit the Account Schedule Formulas and Account Schedule Examples pages if you’re looking for even more ideas on how to improve your financial reporting using account schedules with Microsoft Dynamics NAV.
NAV AS 101 Lesson 20: Sharing with your friends
Posted: June 19, 2014 Filed under: Uncategorized Leave a comment It’s super easy to share your account schedule designs with other people. I share mine all the time and I’ve asked more than a few people to share their designs with me.
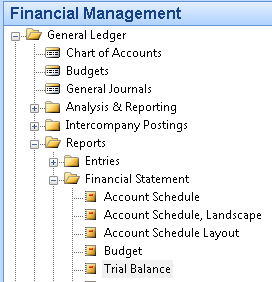
You can always just copy the design view and paste it into Excel, or in Classic versions, go to Financial Management, General Ledger, Reports, Financial Statement, and choose the Account Schedule Layout. In RTC versions, just search for “Account Schedule Layout”. NAV2013 has gone even one step further. When printing an account schedule, if you click a little box in the setup labeled “show account schedule setup”, you get a report that shows your design view right next to your end-user view, which makes it super easy to compare your design and results, or to share it with someone else.
This posting is part of the NAV Account Schedules 101 series. Find the entire list of lessons here.
Don’t forget to visit the Account Schedule Formulas and Account Schedule Examples pages if you’re looking for even more ideas on how to improve your financial reporting using account schedules with Microsoft Dynamics NAV.
NAV AS 101 Lesson 19: Row numbering
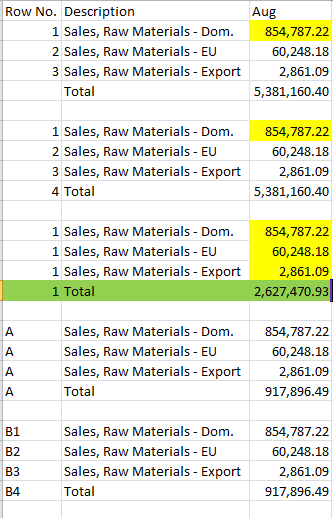
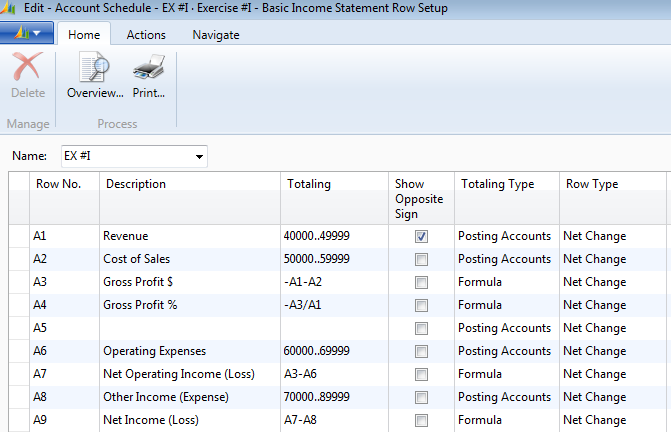
Posted: June 18, 2014 Filed under: Uncategorized Leave a commentRow numbering in account schedules can make you a little crazy until you understand what you need to do to get it right the first time. In the example below, I show the design view for five different ways to number the rows for the same account schedule.
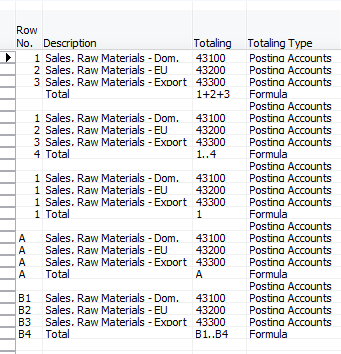
Some of these work, and some of them don’t, and you might be surprised which one you should choose. Let’s look at the results and talk about why we have what we have.
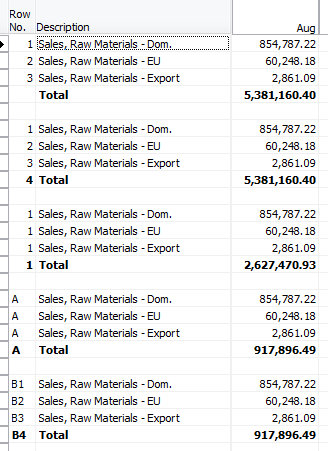
The first and second examples give us the same incorrect result. The third example gives a different incorrect result, and the last two give the same correct result. What is happening?
In the first and second example, the formulas are 1+2+3 and 1..4. In these cases, NAV is picking up any row that has the value of 1, 2 and 3 and adding them all together. The total, highlighted in green, is the sum of all the rows highlighted in yellow.
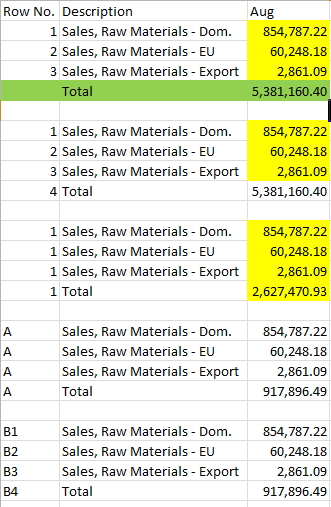
In the third example, the formula asks for the result of any row labeled 1. NAV shows the same behaviour by picking up any row that has a value of 1 and adding them all together. The total, highlighted in green, is the sum of all the rows highlighted in yellow.
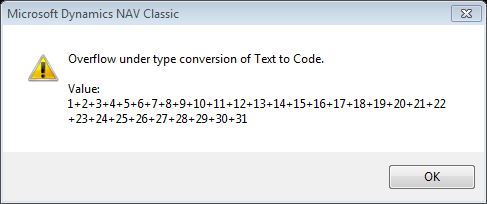
The fourth example, using only the letter A in the formula, will actually have the same problem as the section above it if there are any other sections in the account schedule where the rows are labeled A. However, this technique, called row grouping, will assist you in making your account schedule formulas more efficient. There is a character limit on the number of letters or numbers you can put in an account schedule total, and if you exceed it, you’ll get this error:
The fifth section, using an alpha numeric code, is considered a best practice because it allows you the largest amount of variety when designing a larger sized account schedule and helps you to avoid the types of problems seen above by giving NAV something a little more complex to work with than single numbers or letters.
You can come up with pretty complex account schedules using alpha numeric codes without having to keep track of which numbers may or may not repeat, and you can keep your formulas short and simple, which makes them easier to type and less error prone. Many companies employ this technique in their balance sheet designs, and use alpha numeric codes to subgroup things like current assets and long-term assets, and then group them at a higher level again for total assets. Below is another simple example to show you what a small section of the balance sheet might look like using this technique, this time for fixed assets.

This posting is part of the NAV Account Schedules 101 series. Find the entire list of lessons here.
Don’t forget to visit the Account Schedule Formulas and Account Schedule Examples pages if you’re looking for even more ideas on how to improve your financial reporting using account schedules with Microsoft Dynamics NAV.
NAV AS 101 Lesson 18: Account Schedules not balancing?
Posted: June 17, 2014 Filed under: Uncategorized Leave a commentIf your account schedules are not balancing, there’s one really great place to check and two best practices that will save you some long hours balancing any account schedule.
Great Place to Check
NAV has a “canned” trial balance report that is always right. No matter what you’ve done to your account schedules, you can always check this trial balance and it will always balance to the general ledger. Why? Because is hasn’t been modified, or filtered, or calculated against. This is the first place to check if you’ve got schedules that aren’t balancing. Search for “Trial Balance” in NAV RTC versions, or in Classic versions, find it here:
The report is pretty simple, and will list all your balances, account by account, and even includes an option to print to Excel which is handy because then you can easily compare to your account schedules to help you find the imbalance.

Best Practice #1 – Include checking account schedules as part of your regular routine when adding new general ledger accounts
The number one cause of account schedules that don’t balance is because you have added a new general ledger account to NAV and have neglected to also add the account to the reports you have designed with account schedules. In order to prevent this from happening, the moment after you finish adding an account to the general ledger, immediately proceed to account schedules to go insert the new account there. Do not wait. Don’t believe you’ll do it later. You will forget. Do it now. Really.
If you can’t figure out which account has caused the problem, run yourself a copy of the NAV canned trial balance. The canned trial balance will automatically pick up new accounts which you’ve created and you’ll be able to quickly see which account is missing from your account schedules.
Best Practice #2 – When building account schedules, use continuous account ranges
In order to avoid having to deal with the above, take the time to build your account schedules using continuous account ranges. The example below shows perfectly designed continuous account ranges. There is no room to insert a new general ledger account number in between these ranges. Account schedules, when designed this way, will automatically pick up newly created general ledger accounts every time.
This posting is part of the NAV Account Schedules 101 series. Find the entire list of lessons here.
Don’t forget to visit the Account Schedule Formulas and Account Schedule Examples pages if you’re looking for even more ideas on how to improve your financial reporting using account schedules with Microsoft Dynamics NAV.
Week seven recap: Account Schedules 101
Posted: June 6, 2014 Filed under: Uncategorized Leave a commentHere’s the week 7 recap on the NAV Account Schedules 101 series. Follow the links below to view the posts for each of the lessons we covered this week or view the entire series here.
NAV AS 101 Lesson 15: Dimensions with Account Schedules
NAV AS 101 Lesson 16: Analysis Views
NAV AS 101 Lesson 17: Budgets with Account Schedules
Don’t forget to visit the Account Schedule Formulas and Account Schedule Examples pages if you’re looking for even more ideas on how to improve your financial reporting using account schedules with Microsoft Dynamics NAV.
Article about Dynamics NAV Financials on MSDynamicsWorld.com
Posted: June 6, 2014 Filed under: Uncategorized Leave a comment Jason Gumpert did a nice article about Dynamics NAV Financials today, you can find it here: The finer points of Microsoft Dynamics NAV account schedules: One comptroller’s journey
")

