Blogiversary Top 20 (#2) NAV keyboard shortcuts – Classic to RTC
Posted: April 26, 2013 Filed under: Uncategorized | Tags: Classic Client, keyboard shortcut, Microsoft, NAVUG, RTC, tips and tricks, user group Leave a commentWe’re celebrating our one year blogiversary by reposting the Top 20 Most Viewed in the last year, as determined by you, our readers! Follow this link to see the entire list. Enjoy!
Who knew that keyboard shortcuts could be so darn controversial?
I recently got the chance to present a NAV tips and tricks session at the NAVUG Midwest Regional Chapter meeting, and one topic that came up again and again was what keyboard shortcuts were changing in the transition from the classic client to the role-tailored client (RTC).
The first discussion started as a rumor during the social hour the night prior. “Did you hear they’re getting rid of F8?” “No, they can’t get rid of F8!” “What’ll we do without F8?” “Oh my inventory accountant is going to hate that” “Well I heard they’re changing everything.”
Well lucky for us we had quite a few folks there who have already been using the RTC who were able to quite handily put that vicious rumor to rest. F8 is firmly available to copy the field above in the new client, just has it has been in the classic client.
There are quite a few other things that are just simply changing, and I think the changes make a whole lot of sense.
Take F3. F3 has been the constant companion of the NAV user, utilized whenever we needed to designate a new record, a new line, a new document, or a new card. Anything new has been F3. This has been replaced with four new commands in the RTC. Complicated? No, I think that Microsoft has made a concerted effort to simplify by making keyboard shortcuts more consistent with other Microsoft Office products. Even though four new commands are replacing one, I think that Ctrl+N will come quite naturally to someone wanting to create a new record. Ctrl+Insert likewise makes sense for inserting a new line. Ctrl+Shift+C for opening a new card and Ctrl-F2 for creating a new document may be a little taxing, but I’m betting we’ll all get used to it. Frankly, I’m glad to see Microsoft making it easier and more consistent for new users to adopt.
I’m sure I may utter an oath or two when I hit F3 in the RTC and instead of getting a new record, get bumped into a field filter. But I sure will appreciate many of the brand new keyboard shortcuts that support RTC features that we’ve never had before like Alt+Tab to switch among open windows and F5 which now acts as a refresh command, just like it does in other programs.
Check out the link below which goes to a Microsoft .pdf listing out a nice comparative list of keyboard shortcuts between the classic client and the RTC. This will be the first document I give to my end users when we start working on our transition to the RTC. There will always be fear of change, even with small things like keyboard shortcuts.
Encourage folks to look for the consistencies and efficiencies gained with the new ones and remind them; at least they didn’t get rid of F8.
Blogiversary Top 20 (#3) Basic column layout options for NAV Account Schedules
Posted: April 25, 2013 Filed under: Uncategorized | Tags: Account Schedules, balance at date, Classic Client, column layout, comparison date formula, comparison period formula, financial statement, fiscal year, general ledger, NAV, net change, RTC Leave a commentWe’re celebrating our one year blogiversary by reposting the Top 20 Most Viewed in the last year, as determined by you, our readers! Follow this link to see the entire list. Enjoy!
Column layouts in NAV account schedules are what you build to add more flexibility to your financial statements. You can have an unlimited number of column layouts to match together with your already existing row setups. In general, most basic row setups contain general ledger numbers and column layouts contain dates. As an example, when I produce my income statement, I will have one row setup that reflects a summarized income statement and at least four different column layouts that reflect different configurations of month to date, year to date, comparisons against budget, and twelve month trended views.
Just like with row setups, there are many available options in the column layouts. This large variety of options can sometimes be overwhelming to the new account schedule user. I’ll show you which columns to choose in the column layouts for account schedules as a beginning point, and go through some simple explanations of how they are used.
Fields to start with:
Column No. – The column number is completely optional, but highly recommended. This simple element of the column layout will eventually be one of the key features of your account schedule, allowing you to calculate and organize with ease.
Column Header – This is where you’ll define, in words, what you’re showing in each column of your report. Keep it short; there is a 30 character limit.
Column Type: Net Change, Balance at Date, or Formula – There are actually seven options to choose from here, but I recommend that you limit yourself to these three when you’re just getting started. The key here is knowing what type of accounts you’re reporting on. If you’re using income statement accounts (Revenue/Expense), then you need to use net change. If you’re using balance sheet accounts (Assets/Liabilities), then you need to use Balance at Date. Formula allows you to perform calculations in a column.
Ledger Entry Type – This column will allow you to define what type of ledger entries you will show. This is where you can choose actual general ledger entries or budgeted general ledger entries.
Formula – If you’ve chosen Formula as the Column Type, this is where you’ll put the formula.
Comparison Period Formula – This column allows you to define date formulas that are used to calculate the amounts shown. I generally recommend that beginning account schedule users start out using the comparison period formula field instead of the comparison date formula field. The comparison period formula field references the accounting periods set up in the fiscal year, so this option seems the most consistent, and is especially necessary for companies that may not follow a calendar fiscal year. Common data labels used in this field are CP for current period or -1CP for previous period and FY for fiscal year or -1FY for prior year.
Shown below are both the design view and the user view of a column layout for a summarized income statement showing year to date and prior year to date information in the columns to demonstrate the use of these six basic options in an account schedule.
Role Tailored Client


Classic Client


For more information on row setups, please see these posts: Basic row setup options for NAV Account Schedules and Complete row setup options for NAV account schedules.
If you’re just beginning to use account schedules, see Getting started with a new account schedule.
Blogiversary Top 20 (#4) Maximize your Microsoft Dynamics NAV 2009 Classic screen space with user level configuration options
Posted: April 24, 2013 Filed under: Uncategorized | Tags: Classic Client, glued column, increase header, NAV, RTC, user level configuration Leave a commentWe’re celebrating our one year blogiversary by reposting the Top 20 Most Viewed in the last year, as determined by you, our readers! Follow this link to see the entire list. Enjoy!
One of the first things I do when I get a new person started using NAV is to show them how to customize their screens using different NAV options available at the user level. The NAV defaults start us off with white space in weird places, columns we may not necessarily use, and headers we can’t read. These are all possible to fix easily at the user level, and I’ll share my six tricks with you today.
Today we’re just going to cover the Microsoft Dynamics NAV 2009 Classic client. The Role Tailored Client, with its updated look and feel, is significantly different and Microsoft has done a great job of addressing many of these small challenges with the new client.
- Change the size of the main navigation pane. You can do this by hovering on the vertical blue separator bar until you get a double-sided arrow, and then move your pane to the left or right.
- Get rid of unwanted menu options. If you’re not using the Jobs or Service Menus, right-click on that item and choose hide. You can always add something back to the menu by right clicking and choosing show.
- Increase your header size. Every screen starts out with the header line as one line tall. This means that you can’t read most of the information in your headers. Hover at the bottom of the blank grey box at the top left of the lines area until you get a double ended arrow, then click and pull down to see more lines within the header.
- Check your row height. Depending on your preference, you might prefer rows taller or shorter than what is the default. Choose any grey separator bar on the left side of the lines area between two rows and move it up for shorter or down for taller. Your adjustment will be equally sized for all rows.
- Change your columns. Make sure to show only the things you need. There are almost always more options available with the default than what you will use in day-to-day transactions. If you have a coworker in a similar role, it may be best to check to see what they use regularly when you’re just getting started. Hide anything you don’t need just by using right-click and hide. Just like with the menu options, you can right-click and show if you want to put something back on your screen.
- Make the glued column smaller. In NAV 2009 Classic, on every screen, one column is always designated as the “glued” column. This column is generally the Description column. You’ll know which one this is when you try to resize it to a smaller size and get the error, “You resized the glued column Description, which then expanded automatically to fill otherwise empty space”. This can get frustrating for new users, because it seems there is not a solution. There are two recommendations that I have to get past this.
- Place your mouse to the right of the glued column separator, and move from right to left until you get a double-headed arrow. Left click, hold, and aggressively move to the left, farther than where you want to end up. This will make your glued column narrower, but only if you have a bunch of columns off to the right already.
- Another way to accomplish this is to add a column that you don’t need to the right and make it really really wide, so that it creates visual white space on the right hand portion of your screen.
Before

After

Blogiversary Top 20 (#6) Getting started with a new account schedule
Posted: April 22, 2013 Filed under: Uncategorized | Tags: Account Schedules, Classic Client, NAV, RTC Leave a commentWe’re celebrating our one year blogiversary by reposting the Top 20 Most Viewed in the last year, as determined by you, our readers! Follow this link to see the entire list. Enjoy
If you are just getting started with account schedules, you need some basic information to get going. This post will show you where to find account schedules in NAV, how to create a new one, and how to name them. We’ll cover both the role-tailored client (RTC) as well as the classic client.
Where can you find them?
If you’re using NAV with the RTC, choose Departments, then General Ledger from the Financial Management menu, then choose the Account Schedules link under the Reports and Analysis and Analysis & Reporting menus.

If you’re using NAV 2009 and prior versions with the classic client, choose Financial Management=>General Ledger=>Analysis & Reporting=>Account Schedules.

How do you create a new account schedule?
In the RTC, creating a new account schedule is made easy with the New button located on the action pane. If you’re a keyboard shortcuts person, you can use Ctrl-N, or if you prefer to use menu options, go to Actions=>New.

In the classic client, use F3 to create a new record for the account schedule, or select New from the Edit menu.

How do you name a new account schedule?
Once you’ve created a new report using the RTC, you’ve got 10 characters available for the Name field, and 80 characters available for the Description field.

The classic client has the same parameters.

Both clients will allow you to use any combination of numbers, letters, or special characters.
Keep in mind, that regardless of whether you are using RTC or the classic client, the names you use for the description field will be the default names used when you print account schedules directly out of NAV.
Blogiversary Top 20 (#11) Complete row setup options for NAV account schedules
Posted: April 15, 2013 Filed under: Uncategorized | Tags: Account Schedules, balance at date, Classic Client, column layout, dimensions, Excel, export to excel, financial statement, general ledger, NAV, net change, posting accounts, row setup, RTC, set base for percent, setup options, show opposite sign, totaling type, trial balance Leave a commentWe’re celebrating our one year blogiversary by reposting the Top 20 Most Viewed in the last year, as determined by you, our readers! Follow this link to see the entire list. Enjoy!
About a month ago, I published a post called Basic row setup options for NAV account schedules. This is a great place to look if you’re just getting started. However, if you’re looking for what else you can do with Microsoft Dynamics NAV account schedules, then this is where you want to be. This post will go through each and every field available on the account schedule row setup and talk about the available options. The functionality of these fields are exactly the same between the Classic and Role Tailored Clients. The only difference is in how they look on the screen and how you navigate between screens. Take a look at the pictures below to find the look you’re familiar with, but then keep reading for the explanations of what these fields will do in your financial reporting.
Role Tailored Client
This is a view of what I recommend you start with for basic row setup options.

This is a view of all available row setup options.

Classic Client
This is a view of what I recommend you start with for basic row setup options.

This is a view of all available row setup options.

Row setup options – apply to both clients
Row No. is completely optional, but highly recommended. This simple element of the row setup will eventually be one of the key features of your account schedule, allowing you to calculate and organize with ease.
Description is the one place you have to communicate, in words, what you’re showing on each line of your report.
Totaling Type: 6 options to choose from
- Posting Accounts pull data from your accounts designated as posting accounts on the G/L Account Card Account Type field.
- Total Accounts pull data from your accounts designated as a total or as an end-total on the G/L Account Card Account Type field.
- Formula allows you to calculate a basic formula on this row.
- Underline places a single underline .
- Double Underline places a double underline.
- NOTE: This nifty addition showed up with NAV 2009 R2. If you are NAV 2009 SP1 or earlier, this won’t be available to you.
- Both of the underline functions are there to give folks who print account schedules directly out of NAV some formatting options. If you’re exporting to Excel you’ve got some better format options to work with than these.
- Set Base for Percent allows you to designate which row from your row setup will be used as the beginning point for a section to be included in a percent of total calculation. This feature showed up in version 5.0 and must be used together with a formula on another row to designate the end point of the section as well as some setup in the column layout. It’s a little fussy in the setup and inelegant in execution, but is still effective to get those vital comparative percentages onto your account schedules.
Totaling will be which general ledger accounts you want to pull or what formula you want to calculate, depending on what you selected in totaling type.
Row Type: 3 options to choose from
- Net Change should be used, generally, if you’re reporting on income statement accounts (revenue/expense).
- Balance at Date should be used, generally, if you’re reporting on balance sheet accounts (assets/liabilities).
- Beginning Balance will be sparingly used, but you’ll want this for your statement of cash flows at some point.
Amount Type gives you three options: Net Amount, Debit Amount and Credit Amount. You’re going to use Net Amount almost all the time, but I suppose if you were getting very granular in your account schedules and perhaps using them for detailed reconciling reports, this might be useful. If I’m getting down to this level of transactional detail, I’m usually going to the chart of accounts instead of account schedules.
Formatting Fields: Bold, Italic, and Underline These basic formatting fields are there to allow you to emphasize some of the rows of your account schedules. When you select these options on any row, the whole row is effected. You are not able to effect a single “cell” for formatting. What’s the difference between underline here and underline found in the Totaling Type options? You can get a more snug fit on your underline using this option since it appears in the same row of your data instead of in a row if its own.
New Page inserts a page break. This is commonly used when separating the pages of the balance sheet showing assets on the first page and liabilities and equity on the second page. I have also seen it used when folks build multi page account schedules.
Show Opposite Sign is the option you can select to change revenue credit balances or expense debit balances to the opposite sign for the purposes of presenting this data in a more non-finance friendly manner. No salesperson wants to see sales presented with a negative sign; use this to change that credit to a positive number on your reporting.
Show allows you to designate if a row will show (the default) or be hidden on the printed account schedule only. You can click this box as much as you want, but your rows will still show on-screen or when you export to Excel. If you print directly out of account schedules, this feature will work very well for you.
Dimension Totaling is the last option available and you might have noticed that I didn’t show them on pictures above. This is because they are unique for just about every user, and depending on your analysis view setup, may even be different from schedule to schedule. You can use just one, or you can use all four of the available dimension totaling fields, in whatever combination you like. These fields act very much like the Totaling field because this is where you will tell NAV what Dimensions you want shown and totaled from your general ledger accounts.
Blogiversary Top 20 (#13) Basic row setup options for NAV Account Schedules
Posted: April 11, 2013 Filed under: Uncategorized | Tags: Account Schedules, balance at date, Classic Client, financial statement, net change, row setup, RTC, totaling type Leave a commentWe’re celebrating our one year blogiversary by reposting the Top 20 Most Viewed in the last year, as determined by you, our readers! Follow this link to see the entire list. Enjoy!
The perpetual problem of the new NAV user is when you get started in a new area of the application, there are way too many options to choose from. How many times have you opened up a new form, only to find twenty or more columns displayed as the default, and many more lurking behind the show columns menu? While we appreciate having all options for all people at some point, new users can find this especially daunting when trying to just get started with something new.
I’ll show you which columns to choose in the row setup for account schedules as a beginning point, and go through some simple explanations of how they are used.
Fields to start with:
Row No. – The row number is completely optional, but highly recommended. This simple element of the row setup will eventually be one of the key features of your account schedule, allowing you to calculate and organize with ease.
Description – This is the one place you have to communicate, in words, what you’re showing on each line of your report.
Totaling Type: Posting Accounts or Formula – This field tells NAV what you’re going to do here. You’re either going to pull data from your general ledger posting accounts or calculate a formula.
Totaling – Which general ledger accounts you want to pull or what formula you want to calculate.
Row Type: Net Change or Balance at Date – The key here is knowing what type of accounts you’re reporting on. If you’re using income statement accounts (Revenue/Expense), then you need to use net change. If you’re using balance sheet accounts (assets/liabilities), then you need to use Balance at Date.
Shown below are both the design view and the user view of a summarized income statement, showing the use of these five options.
Role Tailored Client


Classic Client


Blogiversary Top 20 (#19) The NAV accountant’s little helper: the reconciliation account check box
Posted: April 3, 2013 Filed under: Uncategorized | Tags: balance after posting, Classic Client, general ledger, journal entry, NAV, net change, posting test report, reconciliation account, RTC, tips and tricks Leave a commentWe’re celebrating our one year blogiversary by reposting the Top 20 Most Viewed in the last year, as determined by you, our readers! Follow this link to see the entire list. Enjoy!
There’s a tiny feature in NAV that I take for granted. It’s there, in the background, hiding in the setup, and it helps me out just a little almost every time I make a manual journal entry. Especially if I’m in a bit of a rush, or distracted, this option gives me one more quick but effective look at what I’m doing before I commit a journal entry to my books permanently. This nifty little thing can be added to your NAV setup at any time without any help from IT and won’t require any maintenance. The option I’m talking about is the Reconciliation Account check box you can find on your general ledger account card. Here’s where you can find it:
Role Tailored Client

Classic Client

For any account where you’d like this additional double check, check the Reconciliation Account box found on the General Ledger Account Card. Now go put together your journal entry.

Instead of posting directly from the entry, choose Actions=>Posting=>Test Report=>Preview (if you’re RTC) or just choose Posting=>Test Report=>Preview (if you’re Classic). NAV will put together a handy dandy print preview which will now include a section at the bottom labeled Reconciliation. This little section will show you which direction your entry is going in, what sign your ending balance will be, and what the actual balance after posting will look like. This all happens before you commit it as final to the system. This may be just the extra bit of help you need in order to keep you from making an error. If you like what you see, post that journal entry!

If you have an account where you’ve got a lot of daily activity, you may not find this as useful as you do with accounts with just a little bit of activity throughout the month because you’ll have a more frequently changing end balance. Decide what might be useful to you.
Next time you do a journal entry, give it a try. Go to the account card and check the box. Make your journal entry. Before you post, run the posting test report. Is the net change in your journal entry going in the right direction? Did you enter the correct account? Is your ending account balance the right sign? Most importantly, is the balance after posting what you expected? This little helper can give you a quick preview before you hit post and save you from having to reverse and correct an entry.
DynamicsNAVFinancials blog celebrates one year with top 20 postings
Posted: April 1, 2013 Filed under: Uncategorized | Tags: Account Schedules, budgets, Classic Client, Convergence, dimensions, Dynamics, Excel, export to excel, financial reporting, financial statement, general ledger, NAV, NAV 2013, NAVUG, payment terms, PowerPivot, tips and tricks, user group 2 Comments It’s our blogiversary! I started this blog in April 0f 2012, inspired by the number of NAV end users I had met over the last year who had the same questions that just weren’t getting answered. What better way to get that information out to folks than a blog where I could write up the topic in an easy to understand way?
You’ve shown your support! Over that last year, we’ve had over 15,000 views, almost 100 followers via email, have people following us on our new Facebook page, and know that many of you follow postings through the RSS feed. People from more than 120 countries are reading DynamicsNAVFinancials! The blog has gotten enough attention to be picked up for syndication through Microsoft Dynamics Community and I was even asked to participate as one of the eleven official bloggers at Microsoft Dynamics Convergence 2013 last month.
Special thanks has got to go to the NAVUG. The user group has been especially supportive of me and of the blog, finding opportunities for me to speak to NAV users in person, in webinars, online classes, and through this blog. Without the support of the user group this would have been a much longer road and I am so grateful for the constant work they have done to get me in front of as many readers as possible.
Publishing over an entry a week in the last year, there’s a lot to choose from, but in the month of April, I’ll be re-running the top 20 postings determined by the most viewed entries. Enjoy, and thank you so much for reading! There would be no reason to do this without you!
19 The NAV accountant’s little helper: the reconciliation account check box
18 Learning about Microsoft Dynamics NAV 2013: on demand learning from NAVUG is a fantastic resource!
17 Tis the (Budget) Season! Three handy NAV account schedule tips to get you through
16 Tips and tricks for a flawless budget load in NAV
15 Why NAV users should be using dual monitors
14 Video Demo: How to export NAV account schedules to Microsoft Excel
13 Basic row setup options for NAV Account Schedules
12 Aging methods in NAV – which buckets are you looking for?
11 Complete row setup options for NAV account schedules
10 Learning about Microsoft Dynamics NAV 2013
9 Where can I learn more about NAV analysis reports and analysis by dimensions?
8 10 easy tips for payment terms success in Microsoft Dynamics NAV
6 Getting started with a new account schedule
4 Maximize your Microsoft Dynamics NAV 2009 Classic screen space with user level configuration options
3 Basic column layout options for NAV Account Schedules
2 NAV keyboard shortcuts – Classic to RTC
1 The Account Schedules Formulas Page
NAV dimensions in budgets and consolidations (part 12 of 15)
Posted: March 26, 2013 Filed under: Uncategorized | Tags: Account Schedules, budgets, Classic Client, consolidation, dimensions, financial reporting, financial statement, global, NAV, shortcut Leave a commentNow that you know you can view dimensions on postings and in financial reporting though account schedules, let me show you how you can utilize dimensions in budgets. NAV budgets opens up a few more possibilities for you where dimensions are concerned. Take a look at this screen shot, using the classic client, that shows clearly what the available dimensions are in budgets.
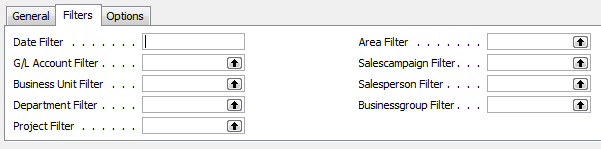 If you look at the left side, you can see the persistent global dimensions of Department and Project which the test database for Cronus uses. Just like all areas of NAV, global dimensions are available everywhere, even in budgets. On the right hand side, you can actually see four more dimensions. These are shortcut dimensions and if you count, you can see you’ve got a total of six dimensions available with NAV budgets to use for your planning process. As long as you budget for a dimension then you can report actual versus budgeted against that dimension.
In addition, you can also see there is a field called business unit filter, which I’ve always counted on as a “bonus” dimension. This field becomes useful when you have multiple companies in NAV and use them to consolidate your financial statements. I’ve got a very simple setup where I have two companies and a consolidation company. When I consolidate my statements monthly, and when I load my budgets, I designate the business unit filter for each of the two companies so I can report on them individually as well as together, on a consolidated level. Because I use separate companies with the business unit filter I don’t need to use a dimension to designate company for my financial statements.
Keep reading this month as we continue our series, 15 Days of NAV Dimensions.
I’m presenting at Microsoft Dynamics Convergence 2013 in New Orleans!
Posted: February 11, 2013 Filed under: Uncategorized | Tags: Account Schedules, Classic Client, Convergence, dimensions, NAVUG, RTC, user group 1 Comment For those of you who are regular readers at DynamicsNAVfinancials.com, I wanted to let you know I will be presenting at Microsoft Dynamics Convergence 2013 in New Orleans, coming up in March. I’ll be doing a session on Account Schedules on Monday, a session on Dimensions on Thursday, and will be participating in sessions as a panelist for Ask Your Peers: Finance Professionals, as well as Ask Your Peers: Upgrade Experiences. More detailed session descriptions are below and are hosted by NAVUG. If you haven’t yet had the chance to connect with the NAV user group, check out this link on how to get engaged with NAVUG and the Dynamics NAV community at Convergence 2013.
If you’re attending Convergence, I’d love to meet you! Be sure to stop by and say hello!
Account Schedules in Microsoft Dynamics NAV: UBNAV04
Ask Your Peers: Finance Professionals: IDNAV01-R1
")

